Transparent Targets
by Gottlieb
The problem with creating transparent targets in VP is the mysterious gray line that
sometimes appears on the right side of the target. What kind of targets would you want to
make transparent? Well, anything that isn't square! Round targets, horses, boats, whatever.
This guide will explain how to create perfect transparent targets with no annoying lines!

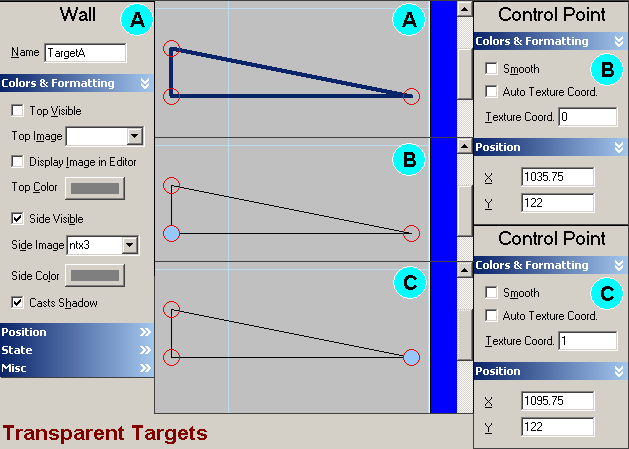
First of all place a target somewhere on the table. Rotate and size it the way you want.
Give your target a Name. You don't want the top of the target visible, otherwise it will be
rectangle, so uncheck the Top Visible box (figure A). You want the sides to be visible so
you can see the target so check Side Visible and enter the name of your Side Image. Shadows
are up to you.
Next, you need to click on the front left Control Point and uncheck Auto Texture Coord. and
set this point as Texture Coordinate 0 (Figure B). That makes this the left side of the
image. Click on the front right Control Point, uncheck Auto Texture Coord. and set this
point as Texture Coordinate 1 (Figure C). That makes this the right side of the image.
Now, the trick to getting rid of the annoying gray line on the right side is... TADA! Don't
make a right side! Simply delete the right rear point so the rectangle is a triangle. You
can move the left rear point so its out of the way near the center if you want.
That's it. Now you have a transparent target with no annoying gray line (of course assuming
you loaded an image with a transparent background and you set the Transparency color to
the same color!)
